Srimax is excited to announce our new product Output Messenger , a fresh & advanced Instant Messenger for Office.
 Try Output Messenger for Free.
OMessenger Vs Output Messenger
How Output Messenger differs from OMessenger:
Try Output Messenger for Free.
OMessenger Vs Output Messenger
How Output Messenger differs from OMessenger:
- Server Based: For more reliable communication & to handle any type of network clients. Central management of users, groups & chat History.
- Multiple Device Login: With single user account, you can login from multi device (desktop / mobile / tablets / web browser) at the same time.
- Voice and Video conferencing: For holding one-to-one and multi-party video conferencing.
- Chat rooms: Group Discussion for projects & teams.
- Security: All communication data are encrypted with SSL protocol.
- Desktop Sharing: Share your screen with colleagues.
- Other features: Off-The-Record messaging, API for integeration, Smart User interface etc
|
|
|
Summary:
1. The Server Pro Tool is running in 192.168.2.1.
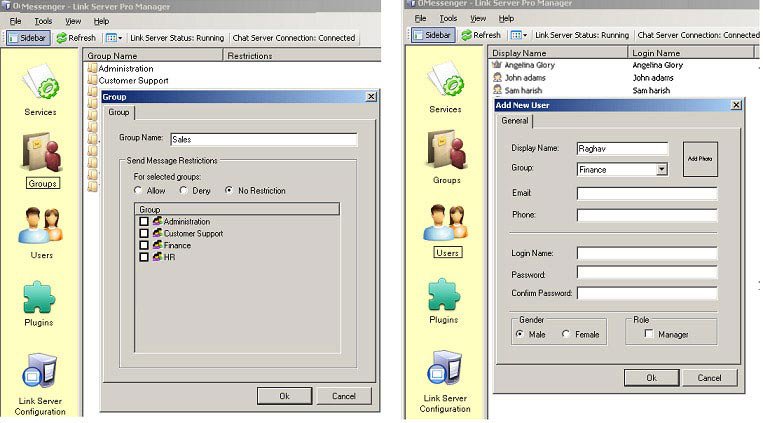
2. Create & Manage Users using Server Pro manager.
3. Client users need to add the Server IP Address in OMessenger Settings & Login to connect with Server.
4. The Server Tool helps to link Authorized users of LAN & Internet.
1. The Server Pro Tool is running in 192.168.2.1.
2. Create & Manage Users using Server Pro manager.
3. Client users need to add the Server IP Address in OMessenger Settings & Login to connect with Server.
4. The Server Tool helps to link Authorized users of LAN & Internet.
1. Install the Server Tool, on any one computer. more details.
2. Server will run as a Windows Service named "OMessenger Server".
3. Configure your Router, to allow remote office users to connect Server Pro through internet.more details.
4. If you have any firewall installed, add OMessengerServerService.exe in the exception list. more details.
5. Run OMessenger Server Pro Manger.(Right click OMessengerServerProManager.exe > Run as Administrator, to avoid any permission issues)
6. Need to add Users & Groups. Active Directory users can also be imported.
 7. Start OMessenger Server Pro Service.
2. Server will run as a Windows Service named "OMessenger Server".
3. Configure your Router, to allow remote office users to connect Server Pro through internet.more details.
4. If you have any firewall installed, add OMessengerServerService.exe in the exception list. more details.
5. Run OMessenger Server Pro Manger.(Right click OMessengerServerProManager.exe > Run as Administrator, to avoid any permission issues)
6. Need to add Users & Groups. Active Directory users can also be imported.
OMessenger:
1. Install OMessenger Installer on each computer in your network.
2. If you have any firewall installed, add OMessenger.exe in the exception list. Click here for more details.
3. In OMessenger User List window, right click and then click Settings
4. In the Settings window, click the Network Tab and provide the Server IP Address. To connect through internet, provide Public IP Address of Server.
 5. Click OK to close the Settings window.
6. In the User List window, you can view the Login Screen.
7. Login using the User Account registered with Server Pro Manager.
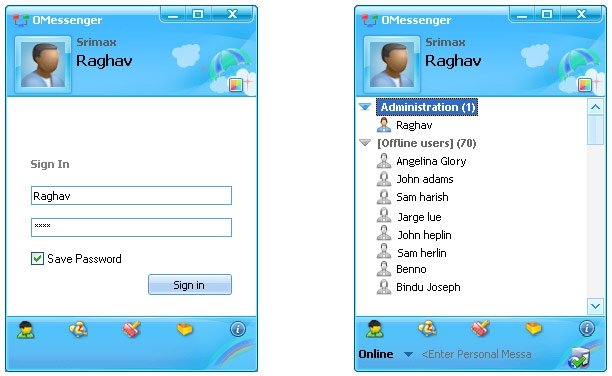 8. Authorized Users connected with Server Pro will be displayed in User List.
1. Install OMessenger Installer on each computer in your network.
2. If you have any firewall installed, add OMessenger.exe in the exception list. Click here for more details.
3. In OMessenger User List window, right click and then click Settings
4. In the Settings window, click the Network Tab and provide the Server IP Address. To connect through internet, provide Public IP Address of Server.
6. In the User List window, you can view the Login Screen.
7. Login using the User Account registered with Server Pro Manager.

