Srimax is excited to announce our new product Output Messenger , a fresh & advanced Instant Messenger for Office.
 Try Output Messenger for Free.
OMessenger Vs Output Messenger
How Output Messenger differs from OMessenger:
 Try Output Messenger for Free.
OMessenger Vs Output Messenger
How Output Messenger differs from OMessenger:
- Server Based: For more reliable communication & to handle any type of network clients. Central management of users, groups & chat History.
- Multiple Device Login: With single user account, you can login from multi device (desktop / mobile / tablets / web browser) at the same time.
- Voice and Video conferencing: For holding one-to-one and multi-party video conferencing.
- Chat rooms: Group Discussion for projects & teams.
- Security: All communication data are encrypted with SSL protocol.
- Desktop Sharing: Share your screen with colleagues.
- Other features: Off-The-Record messaging, API for integeration, Smart User interface etc
|
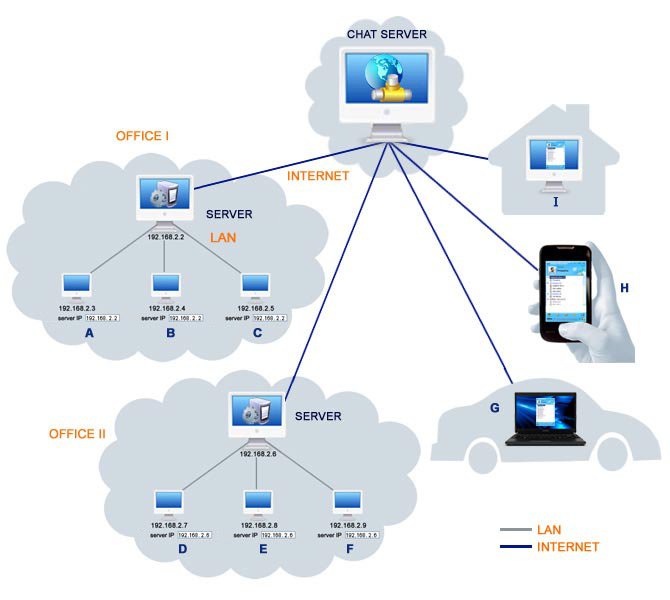
Summary:
1. Get an OMessenger Chat Server Account.
2. For each LAN, install Server in any one computer, which should be connected with Chat Server.
3. All LAN OMessenger clients will be connected with their related Server.
4. Remote OMessenger clients will be connected directly with Chat Server.
5. All Server Users & Remote Users will be displayed in the OMessenger Users List.
I. Chat Server Account:
 II. Install Server:
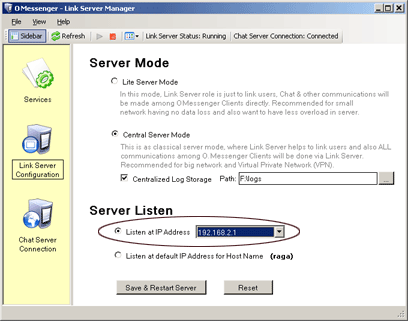
6. Then, Select the listen at IP Address for the Server, which can be reached by all clients.
7. Click "Save & Restart Server"
13. Repeat the above process, for each network.
 III. Install OMessenger:

- Display Name : Enter your name to be displayed in OMessenger.
- Group Name : You can select an existing group name OR enter a new group name.
- Network Card Selection : If you have Static a Network IP Address, select the network card related to your LAN.
For Dynamic IP Address(i.e Obtain an IP Address automatically), Select the Host Name option.
4. Then, Click OK.
5. The User List window will open.
For Local Clients:
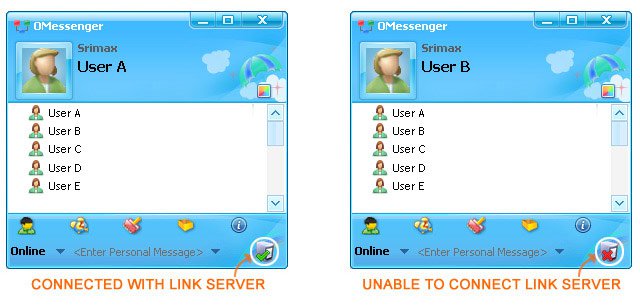
Make sure Server is running in the mentioned IP Address and also check your firewall.
10. Users connected in Server will be displayed in User List.
For Remote Clients:
1. Get an OMessenger Chat Server Account.
2. For each LAN, install Server in any one computer, which should be connected with Chat Server.
3. All LAN OMessenger clients will be connected with their related Server.
4. Remote OMessenger clients will be connected directly with Chat Server.
5. All Server Users & Remote Users will be displayed in the OMessenger Users List.
I. Chat Server Account:
1. Subscribe for an OMessenger Chat Server Hosted Account. Click here for details.
2. You will receive the Account Login & Chat Server details.
2. You will receive the Account Login & Chat Server details.
1. Install the Server Tool, on any one computer. Click here for more details.
2. Server will run as a Windows Service named "OMessenger Server".
3. If you have any firewall installed, add OMessengerServerService.exe in the exception list. Click here for more details.
4. Run Server Manger.
5. Click Server Configuration, Select either Lite Server or Central Server Mode.
- Lite Server Mode just helps to link users. Data transfer will be made directly between users.(not recommended for VPN)
- Central Server Mode helps to link users & also ALL communications will be made via Server.(Recommended)

6. Then, Select the listen at IP Address for the Server, which can be reached by all clients.
7. Click "Save & Restart Server"
8.Click Chat Server Connection.
9.Select the Connect to OMessenger Chat Server checkbox.
10. In Server, enter the Chat Server details.
11. Enter the Access Key defined in Chat Server Manager.
12. Click “Save & Restart Server”
9.Select the Connect to OMessenger Chat Server checkbox.
10. In Server, enter the Chat Server details.
11. Enter the Access Key defined in Chat Server Manager.
12. Click “Save & Restart Server”
OMessenger:
1. Install OMessenger Installer on each computer in your network.
2. If you have any firewall installed, add OMessenger.exe in the exception list. Click here for more details.
3. On the first run of OMessenger, you will see the below window:
1. Install OMessenger Installer on each computer in your network.
2. If you have any firewall installed, add OMessenger.exe in the exception list. Click here for more details.
3. On the first run of OMessenger, you will see the below window:

- Display Name : Enter your name to be displayed in OMessenger.
- Group Name : You can select an existing group name OR enter a new group name.
- Network Card Selection : If you have Static a Network IP Address, select the network card related to your LAN.
For Dynamic IP Address(i.e Obtain an IP Address automatically), Select the Host Name option.
4. Then, Click OK.
5. The User List window will open.
6. Right click the User List, and then click Settings.
7. In the Settings window, click the Network Tab and provide the Server IP Address or Host Name.
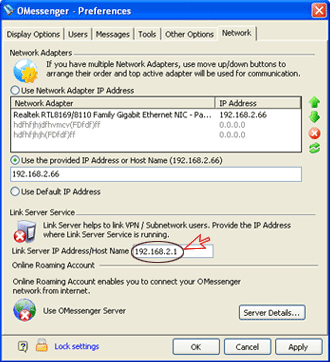
8. Click OK to close the Settings window.
9. In the User List window, you can view the Server status icon in running status.
7. In the Settings window, click the Network Tab and provide the Server IP Address or Host Name.

8. Click OK to close the Settings window.
9. In the User List window, you can view the Server status icon in running status.

Make sure Server is running in the mentioned IP Address and also check your firewall.
10. Users connected in Server will be displayed in User List.
For Remote Clients:
6. Right click the User List, and then click Settings.
7. In the Settings window, click the Network Tab and then click “Server Details”.
8. In the Chat Server Login Screen, select the Connect to OMessenger Chat Server checkbox.
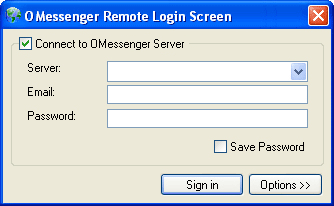
9. In Server, enter the IP Address or Host name of the computer running Chat Server.
10. In Email & Password, provide your related user account details defined in Chat Server.
11. Click “Sign In” to connect Chat Server.
12. In the User List window, you can view the Server status icon in running status.
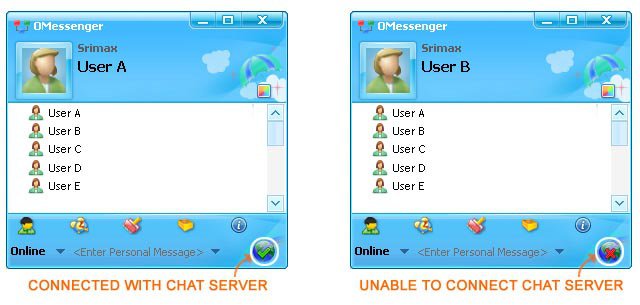
Make sure Server is running in the mentioned IP Address and also check your firewall.
13. In the User List, you can view the users who are directly connected with Chat Server and also the Server users who are connected to Chat Server via Server.
14. Note: If the Server IP Address/Host name is provided in Settings, OMessenger will try to connect to the Server first. If this fails, it will connect to the Chat Server. This is for users who usually work in the Office LAN Network & want to connect via Internet while travelling or working from home.
7. In the Settings window, click the Network Tab and then click “Server Details”.
8. In the Chat Server Login Screen, select the Connect to OMessenger Chat Server checkbox.

9. In Server, enter the IP Address or Host name of the computer running Chat Server.
10. In Email & Password, provide your related user account details defined in Chat Server.
11. Click “Sign In” to connect Chat Server.
12. In the User List window, you can view the Server status icon in running status.

Make sure Server is running in the mentioned IP Address and also check your firewall.
13. In the User List, you can view the users who are directly connected with Chat Server and also the Server users who are connected to Chat Server via Server.
14. Note: If the Server IP Address/Host name is provided in Settings, OMessenger will try to connect to the Server first. If this fails, it will connect to the Chat Server. This is for users who usually work in the Office LAN Network & want to connect via Internet while travelling or working from home.


